

Installing and Configuring Ubuntu Server
Introduction
As mentioned in the previous article, we will use the Ubuntu server for the OS; this will go through making the installation media, installing the Ubuntu, installing Docker and Docker-compose, and finally, we’ll finish by doing some configuration.
Creating the Installation Media
You’ll need a USB flash drive or a CD (if your server has a disc drive) to install Ubuntu Server 22.04. To make a USB install disk, you’ll also need a disk writing utility like balenaEtcher, Fedora Media Writer, GNOME Disks, dd, etc. I’ll cover how to do this with balenaEtcher and dd since that covers both graphical and command line ways of making a USB install disk. The last thing you’ll need is the actual installation ISO image from Ubuntu’s website; download it from here.
Command line
The dd command is a program that copies and converts files and data. We’ll use it to write our ISO file to a USB flash drive. The below dd command will write the ubuntu-22.04.3-live-server-amd64.iso ISO file to our USB flash drive at /dev/sdc. Ensure you update the paths to match the location of your files accordingly (I don’t want you to erase your important data).
1sudo dd if=~/Downloads/ubuntu-22.04.3-live-server-amd64.iso of=/dev/sdc status=progress; sync
So here is the breakdown of what’s going on
if=is assigning the input file that we are going to read fromof=is the output file which we will write to, in this case, a devicestatus=progressgives us a nice progress barsyncat the end flashes the data to the disk
Graphical
You can download balenaEtcher from https://etcher.balena.io/#download-etcher. Download and install the appropriate package for your system, then Launch it.
- Select
Flash from fileand open theubuntu-22.04.3-live-server-amd64.isoISO downloaded earlier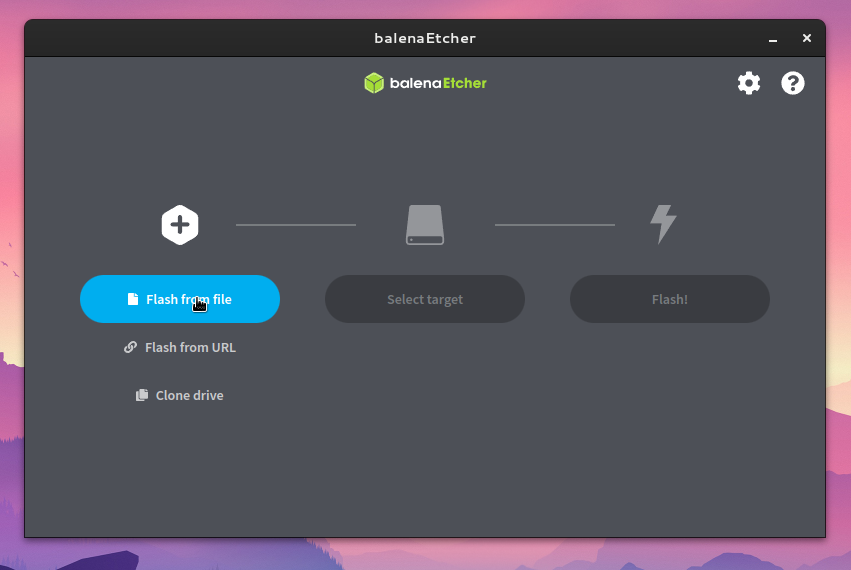
- Click
Select targetand select your USB flash drive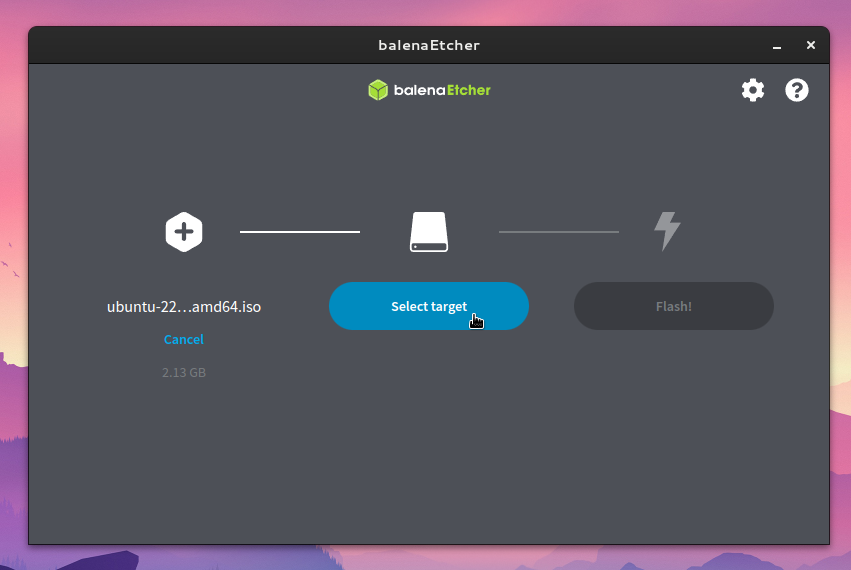
- If you don’t see it, you may need to click the
Show hiddendropdown
- Click
Flashand wait for it to finish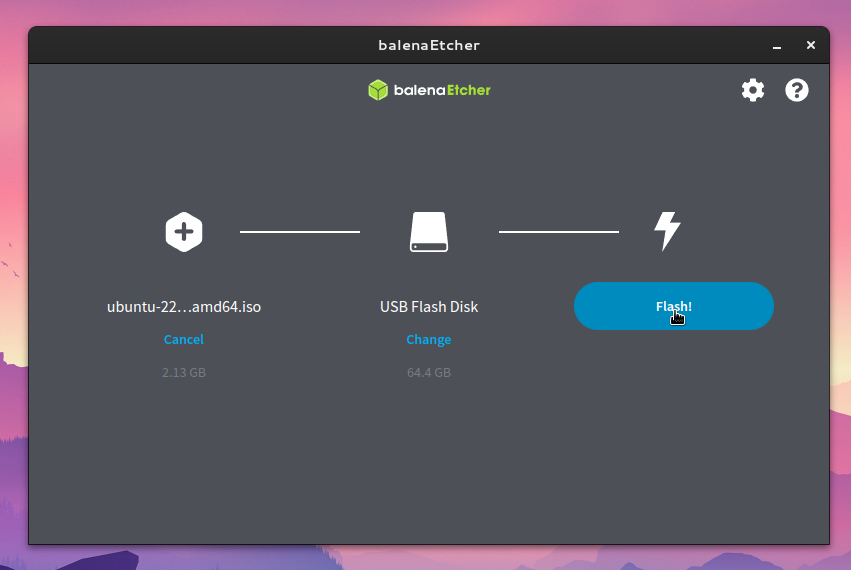
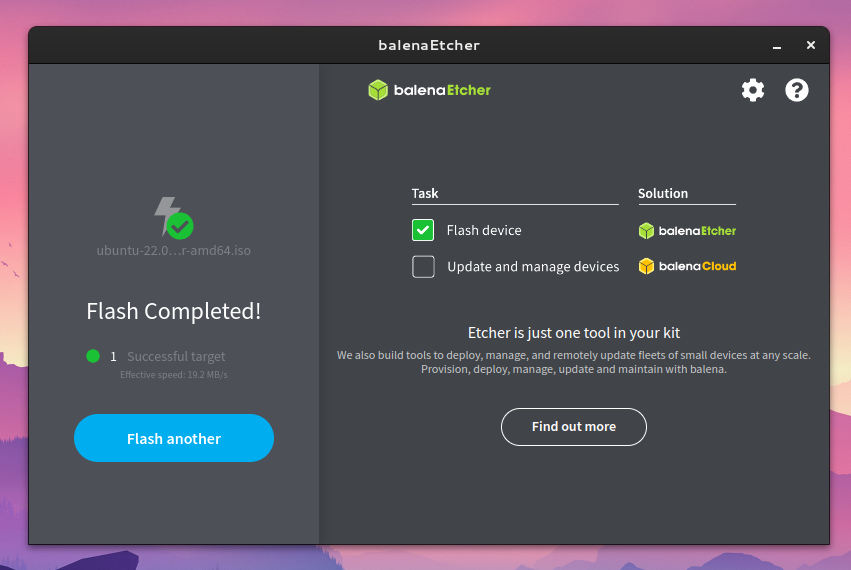
- Done, you can now remove the USB flash drive


Installing Ubuntu Server
Insert the USB flash drive you made in the previous step into the machine in which you’ll be installing Ubuntu server 22.04. Power on the device and hold down your machine’s boot select key, commonly F11 or F12. I’ve also seen F7 or ESC used; if you can’t find the correct key, you can look it up in your motherboard’s manual. After you boot your installation media, you should see a screen like the one below; generally, you’ll choose the top option. However, if you have relatively new hardware or run into any issues, you’ll want to select Ubuntu Server with the HWE kernel; this gives you access to a more recent kernel.

Language and Keyboard
Once you get to the installer, you’ll need to choose which language to use; you can use the arrow keys and enter to navigate and select.

At this point, the installer might prompt you to update; it’s usually a good idea to let it update to the most recent version to avoid any issues during installation. After this, you’ll choose your keyboard layout.

Installation Type
On the next screen, you’ll choose the installation type; you’ll want to leave it as Ubuntu Server; you may want to check the option Search for third-party drivers if you have any proprietary hardware like NVIDIA GPUs.

Configuring Networking
In general, you’ll want to manually set up the network on your server with a static IP address and a bond interface if your server has more than one ethernet port. A static IP is an IP address that does not change and allows the server to be available at a known IP. Network bonding allows treating two or more network interfaces as one; this allows for load balancing if the router you have supports it. In a bond, if something happens to the first interface, the second could take its place without causing disruption.
If you have multiple ethernet cards, select Create bond and then select the devices to use with the bond; in my case, I chose all of them. For Bond mode, choose active-backup for failover or balance-rr for load balancing, then select create.

To configure the interface with a static IP address, select Edit IPv4 under the interface you want to configure and then select Manual from the pop-up.


If you don’t know any of the following information, you should be able to get it from either your router or your computer’s network settings.
The subnet must be filled using CIDR notation; this should look something like 192.168.2.0/24. The address will be the IP you choose for your server, in my case, 192.168.2.2. Check your router’s DHCP range and pick an address outside it to avoid conflicts. For the gateway, this will be the address of your router, which is 192.168.2.1 in my network. Unless you have already set up your own DNS server, you can use Cloudflare 1.1.1.1 or Google 8.8.8.8 for the Name servers. You can leave the Search domains blank unless you already have a home lab or company domain you’d like to use. Select save, and after a bit, you should see the static IP address you chose under the interface you configured.

Storage
We’ll install the OS to an empty disk for this article, and other more complex parts of the configuration, such as ZFS, will happen in other articles. Select Use an entire disk. Under that, select the disk you want to use. I suggest turning off Set up this disk as an LVM group to avoid extra overhead. After you’re sure you have the correct disk selected, continue and write the disk.


User Account and Server Name
Fill in the information for your super user (administrator) account and choose the name for your server. If you have a lot of servers, choosing a naming convention can be helpful, such as calling them after elements, planets, symbols, or stones, or you could go with server-N, where N is a number.

SSH Setup
You’ll want to ensure you select Install OpenSSH server; this will allow you to log in and manage the server from another computer.

Finish and Reboot
After making your last selections, you’ll have to wait for the installation to complete, then select Reboot Now. When prompted, remove the USB and press enter. After the machine reboots, you should see some cloud-init messages about SSH keys and a login prompt when it’s finished.

Configuring Ubuntu Server
Now that you’ve got Ubuntu Server installed, there are a few things to configure to make the server more secure and easier to manage. Some of the following tasks will depend on whether you have particular hardware or what level of security you want to achieve on your server.
Logging into Your Server
To manage your server, you’ll need to login to it by SSH; this is simple on Linux or macOS but requires some extra software for Windows. For Windows, I recommend getting Putty; it can be downloaded from here. To login to your server via a Linux or macOS terminal, use:
1# Replace USERNAME with the username you set on installation
2# For HOSTNAME, you'll use the IP address you set when configuring the network
3ssh USERNAME@HOSTNAME
4
5# In my case, it would be
6ssh superuser@192.168.2.2
To log in using Putty, fill in the username and IP address you used when you installed Ubuntu Server 22.04, then click Open.

Adding SSH Keys and Block Password Login
You’ll notice from the above step that you had to log in using your password; this can get annoying and needs to be more secure if you expose your SSH port to the internet. To fix this first, we’ll need to generate an SSH key; you can do this by running the following command:
1# Fill in everything as default for now; you can do this by pressing enter at each prompt
2ssh-keygen
Now that you have an SSH key, we need to tell the server to use this key as your login credentials. You can do this by using ssh-copy-id; see below:
1# Replace USERNAME with the username you set on installation
2# For HOSTNAME, you'll use the IP address you set when configuring the network
3ssh-copy-id USERNAME@HOSTNAME
4# For mine, this would be
5ssh-copy-id superuser@192.168.2.2
Now that your server has your SSH key, you can log in using the same method as before, but now you won’t be prompted for the password. The next thing you’ll want to do is limit the ability to use a password to log in to SSH. To do this, you’ll create the file /etc/ssh/sshd_config.d/secure.conf with the following contents, but be sure to change the 192.168.0.0/16 to be your subnet:
 1# No password login allowed
 2PasswordAuthentication no
 3# Use publish key (SSH keys) for login
 4PubkeyAuthentication yes
 5# No Kerberos login
 6KerberosAuthentication no
 7# No GSSAPI
 8GSSAPIAuthentication no
 9# Use PAM as the backend for accounts
10UsePAM yes
11# Don't use 2fa tokens
12ChallengeResponseAuthentication no
13# Use this command to check authorization  of SSH keys
14AuthorizedKeysCommand /usr/bin/sss_ssh_authorizedkeys
15# No one is authorized
16AuthorizedKeysCommandUser nobody
17# If the address is within 192.168.0.0/16 range
18Match Address 192.168.0.0/16
19    # Allow password
20    PasswordAuthentication yes
If you don’t know how to create this file, you can do so by using sudo nano /etc/ssh/sshd_config.d/secure.conf, then copy and paste the contents above into the editor using Ctrl+Shift+V, then save it by pressing Ctrl+O pressing enter, then pressing Ctrl+X to exit. If you need to learn how to use the nano text editor, you can learn more here. If you prefer a different editor, then use that one instead.
For the changes you just made to take effect, you’ll need to restart the SSH daemon; you can do this by running:
1sudo systemctl restart ssh
Oh-My-BASH (Optional)
The default shell that ships with Ubuntu is bash; it supports some level of auto-complete and is probably the most common shell on Linux. I usually install Oh-My-BASH as an add-on to enable better auto-complete for commands and case-insensitive auto-complete of directory paths. To add it to your server, run the following commands.
 1# Clone the Oh-My-BASH to your users home directory
 2git clone https://github.com/ohmybash/oh-my-bash.git ~/.oh-my-bash
 3# Backup old bash configuration
 4cp ~/.bashrc ~/.bashrc.orig
 5# Use the bash configuration from oh-my-bash
 6cp ~/.oh-my-bash/templates/bashrc.osh-template ~/.bashrc
 7
 8# switch the theme to use pure instead of font (this is optional)
 9sed -i -e 's/font/pure/g' ~/.bashrc
10
11# make the configuration available to all users (this is optional)
12sed -i -e 's/OSH=.*$/OSH=\"$HOME\/.oh-my-bash\"/g' ~/.bashrc
13sudo cp -R ~/.oh-my-bash /etc/skel/
14sudo cp ~/.bashrc /etc/skel/
Firewall
For firewall configuration, I’ll keep this very simple. You’ll allow the SSH port and then enable the firewall. The commands to do this are below:
1# Allow SSH
2sudo ufw allow OpenSSH
3# Turn on the firewall
4sudo ufw enable
Disable Multipathd (Optional)
If you have devices like NVMe drives in your server configured with bifurcation, then you might get issues with multipath doing some strange things to them, so to solve this use the following command to turn off multipathd:
1sudo systemctl disable --now multipathd
Increase Swapfile size (Optional)
If your server doesn’t have enough memory (RAM), it may crash when running too many services; you can improve by adding more RAM. However, if you cannot add more RAM, you can add a swap file; it’ll perform much slower than RAM and should not be considered a substitute. To resize the swap file
 1# Turn all swap off
 2sudo swapoff -a
 3# Move the swap file somewhere else
 4sudo mkdir /var/vm
 5sudo mv /swap.img /var/vm/swap.img
 6
 7# Increase the size of the swap file
 8# Don't make this file bigger than your drive
 9sudo fallocate -l 64G /var/vm/swap.img
10# Format the swapfile
11sudo mkswap /var/vm/swap.img
12
13# Update the location of the swapfile
14sudo sed -i 's#/swap.img#/var/vm/swap.img#' /etc/fstab
15
16# Enable swap files
17sudo swapon -a
Some Useful Tools (Optional)
I’ve collected a list of helpful tools that will aid you in administrating your server; below is a list of packages and their use.
| Package | Use |
|---|---|
| fish | If you’re unfamiliar with the command line, then Fish can help you by showing you the possible syntax for commands. |
| progress | The command will show you the current status of any move, copy, or deletion processes. |
| ncdu | This command is helpful to check disk usage. |
| smartmontools | These tools will allow you to check the smart status of your drives to determine if you have any issues, such as a drive failure. |
| screen | Allows you to create and detach sessions; this is useful for long-running processes or if your internet connection is unstable. |
| zfsutils-linux | ZFS support for Linux, including kernel modules and tools |
| iotop | A system monitor for I/O operations |
The following will install all the packages:
1sudo apt install -y ncdu smartmontools progress fish screen zfsutils-linux iotop-c
2
3# Allow using iotop as non-root user
4sudo setcap 'cap_net_admin+eip' `readlink -f $(which iotop)`
Install Docker
We’ll use Docker and Docker-Compose to manage most of the infrastructure in this series of articles. Docker will be the engine running containers on the server, and docker-compose will be how we define our infrastructure for Docker, including container, network, and volumes. To install Docker and Docker-Compose, run the following commands:
 1# Get the release of Ubuntu
 2# Note: only LTS releases are supported
 3RELEASE=$(lsb_release -cs)
 4
 5# Install dependencies
 6sudo apt-get install -y apt-transport-https ca-certificates \
 7                        gnupg-agent software-properties-common curl
 8
 9# Add repository
10wget -qO - "https://download.docker.com/linux/ubuntu/gpg" |\
11    gpg --dearmor |\
12    sudo dd status=none of=/etc/apt/trusted.gpg.d/docker.gpg
13echo "deb [arch=amd64] https://download.docker.com/linux/ubuntu $RELEASE stable" |\
14    sudo dd status=none of=/etc/apt/sources.list.d/docker.list
15
16# Install Docker
17sudo apt update
18sudo apt install -y docker-ce docker-ce-cli containerd.io docker-compose
19
20# Add user to group
21sudo usermod -a -G docker $USER
Done
Now that you’ve finished all this, you have an Ubuntu server configured for this series’s remaining articles. The last thing you’ll need before going to the next one is to install Docker-prompt, which is a tool I wrote to make things simpler and reconfigurable; install it from here.


